Wild Gourd Farm

Organic Gardening in St. Louis City

Tag Archives: do-it-yourself

Outdoor Washing Station

2013_06_02_445We took some time off from the gardens on Sunday to work on a project we’d been planning for a long time- an outdoor washing station.

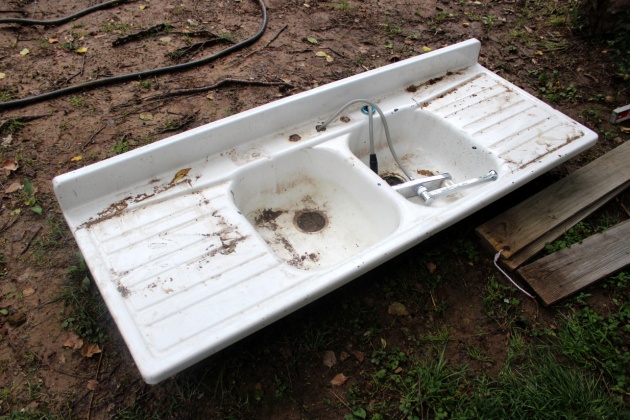
2013_06_02_436It all started falling into place a couple weeks ago when we found this cast iron double sink- complete with faucet and sprayer- in the alley while walking the dogs.  Around the same time, a neighbor of ours started leaving lumber from his home remodel in our side yard for us to use (he somehow got the crazy idea that we collect and re-use materials like that). All we’d need to buy were fittings to secure the sink faucet and adapters to hook the sink up to our hose.

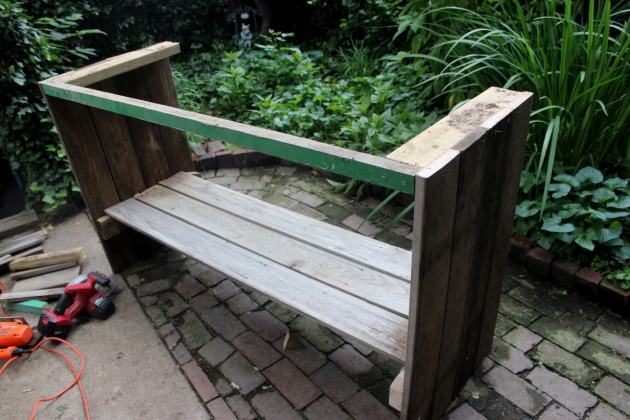
2013_06_02_432 So Eric drew up a plan to build a frame to fit the sink. We had it measured, cut, glued and screwed in under two hours. The sink rests on top of the frame securely.

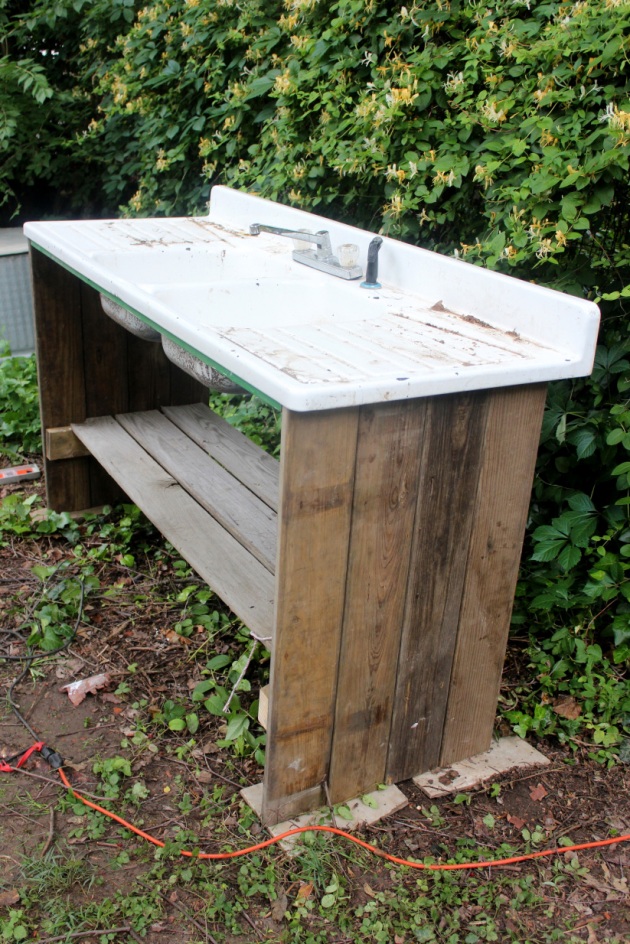
2013_06_02_438We set the new washing station in the side yard, elevating it off the ground on some flat stones to keep the wood from rotting (we’ll probably paint/finish it some day). Next we added the fittings and adapters to secure the sink faucet and connect our garden hose.

2013_06_02_442It works! We’ll still need the hose for watering in the side yard, so we won’t keep the sink hooked up all the time. It’s easy enough to connect and disconnect the hose from the back, though.

2013_06_02_445The bottom shelf will be used for storage and to hold a couple of buckets to catch the water from the drains.  I’m excited to use our new washing station, with its double sink and ample draining space, to rinse off greens and scrub root crops without having to get our nice, white porcelain kitchen sink all dirty. All in all, I’d say it was a pretty good use of our free materials and a Sunday afternoon!

Seed Starting: New and Improved!

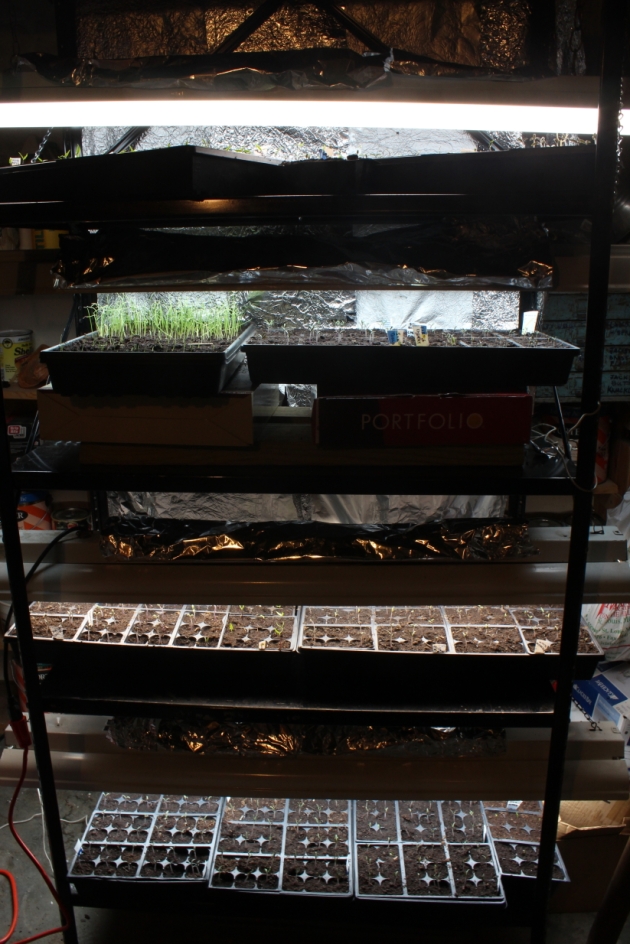
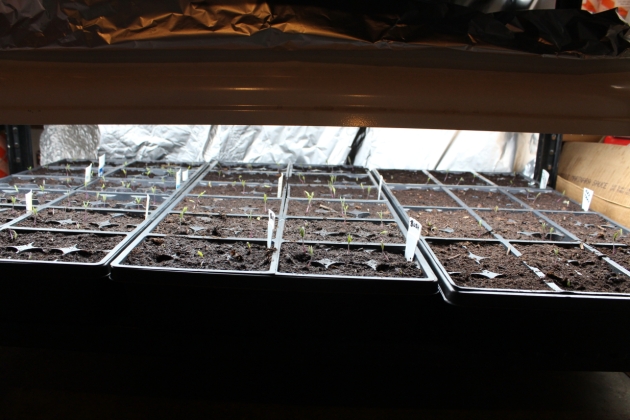
seedling trays under grow lightsWe’ve upgraded our seed-starting operation for this year. From our homemade grow light fixtures, we’ve graduated to four fluorescent shop lights hung on a 6′ x 3′ metal shelving unit. Right now we have about 1,000 seedlings under these lights in our basement; last year our set-up only allowed us to start about 300 at a time. 

2013_02_05_123It all started when we acquired this metal shelving unit and all the light fixtures from Eric’s grandfather, who passed away last year. He was a talented craftsman, and his resourcefulness inspired us to create this set up.

We hung each fluorescent light fixture to the underside of the shelves using chain and wire to suspend them. This will allow us to raise and lower the lights as needed. We also lined the back with foil to reflect light.

2013_02_16_126 2013_02_16_125

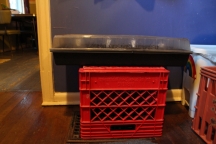
We started our seeds on February 9. We use the Jiffy seedling trays, which contain 72 cells for individual seedlings and come with greenhouse lids to help with germination. We’ve reused ours year after year. We speed up germination by putting some of the trays on heating pads made specifically for growing seedlings. We only have two of these pads, so we got creative. In the left photo, we put a milk crate upside down over a register and placed a seedling tray on top. The right photo shows a small side table with a wicker bottom shelf we placed over a register, which housed two full trays.

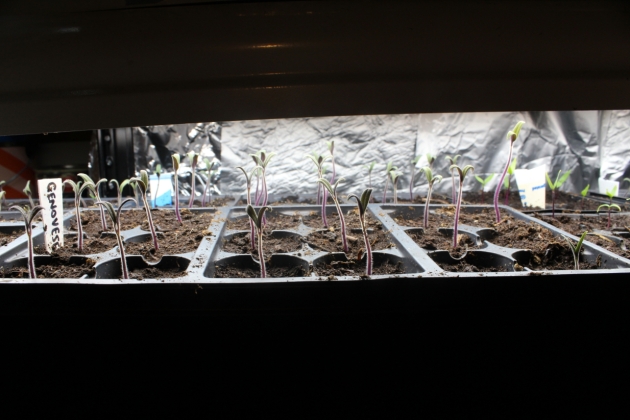
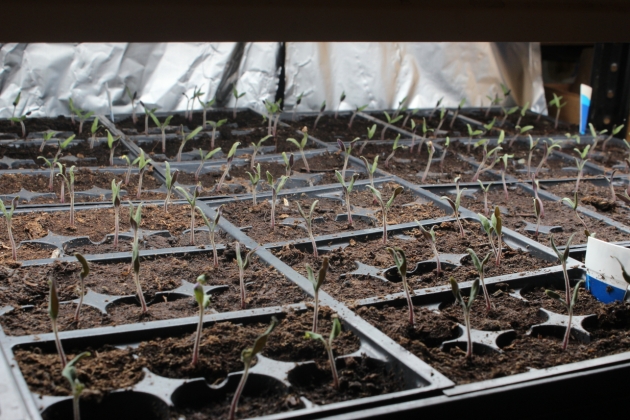
seedlingsThe majority of the tomatoes germinated within 1 week. We removed the lids and put the trays under lights once germinated. This photo was taken February 16.

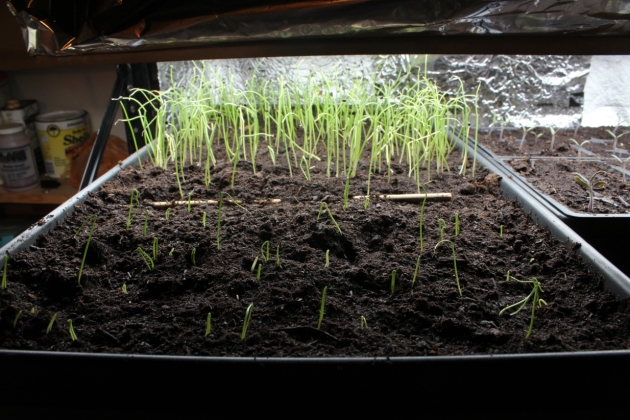
2013_03_02_233For our onions this year, we planted our seeds in a tray without cells. Half of the tray is planted with red onion, the other half is green onion. We’ll buy slips for white or yellow onions, depending on what we can find locally.

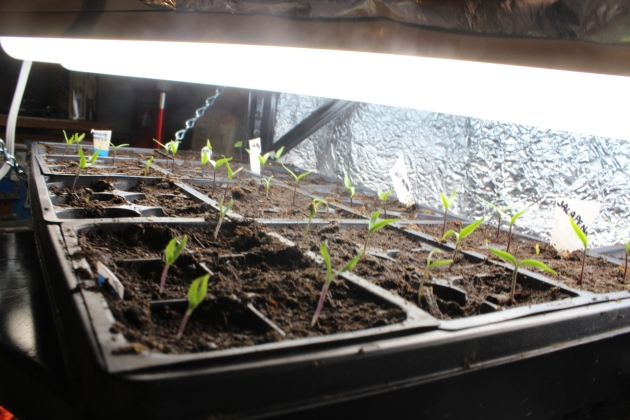
2013_03_02_235These are some of our pepper seedlings. This year we’re growing jalapeno, banana peppers, an heirloom variety from Baker Creek called lipstick, Marconi, and chocolate bell. The peppers take a little longer to germinate than tomatoes.

2013_03_02_236We planted an entire tray with one of our favorite varieties of tomatoes from last year- Costoluto Genovese. If you look toward the right side of the photo, you can see a seedling that shot up faster and taller than its fellow seedlings; we’ll be documenting this plant’s progress throughout the year, and if it lives up to its explosive beginnings, we’ll make sure to save seeds for next year!

2013_03_02_241A sea of tomatoes… we planted a tray of Arkansas Travelers and a bush variety we’ve been saving seeds from for years. We also have two full trays of cherry tomato varieties, including our favorite yellow, as well as some sungold, purple, and red. In smaller quantities, we started heirloom varieties Millionaire and Pierce’s Pride from Baker Creek (given to us free last year), Black Giant, Black Pineapple, and White Wonder.

We plan to plant about 100 tomato and 50 pepper plants this season. We’ll be selling the rest in the St. Louis area. We’ll be up-potting these soon and will continue to document the progress!

Frugal Saturday: Homemade Goat Cheese

Sorry, dear readers, for the lack of posts lately. Have no fear, we’re still working tirelessly in the gardens, it’s just my blogging time has been constrained since I’ve started working (outside the home) again, at a small, family-owned grocery store. I have a huge amount of respect for the owners and all of the employees there; the store’s slogan is “Know Your Food” and everyone is committed to the mission of supporting local farmers and providing organically grown, sustainably-raised products.

You probably know that I identify as a vegan, though I do sometimes use the eggs from our own chickens in cooking or baking- I know they have a happy life. My ethics haven’t changed, and I will always vehemently oppose factory farms and CAFOs, but I have started consuming dairy products, in very limited quantities. I’m not talking about straight-up buying Velveeta or Cheez-Whiz or anything- at the very least the dairy at the store is nearly all produced humanely and sustainably, though I’m still hesitant.

The thing is, given the time and energy that goes into producing the product and its packaging (plastic is made from petroleum after all, and petroleum is inevitably used in the production of glass and cardboard as well), it hurts my soul way more to see that product go to waste. In most cases, expired dairy products from the store aren’t just discarded like at most grocery chains- they’re up for grabs by employees before being donated to a local food pantry. However, this week there was a whole case of organic goat milk that expired, which the food pantry didn’t want. So what’s an ethical vegan to do?

Make goat cheese, that’s what!

Read more of this post

Bloggin’ bout Mushroom Loggin’

It might be an understatement to say that we were inspired by the mushroom log workshop at Maya Creek. Since then, we’ve inoculated logs with over 2,500 mushroom spore plugs (from Fungi Perfecti)!

At the workshop we learned that white oak is the best wood for shiitake mushrooms. We weren’t necessarily planning on growing so many mushrooms,  but after Eric’s grandfather passed, we were told that a white oak tree in his yard needed to come down before they could sell the house. We think Eric’s grandfather- a very resourceful craftsman- would be happy to know that the tree is being used in his honor even after it was cut down.

Eric worked with the tree company that removed the white oak, and picked out the best wood for us to work with. Tree limbs have a greater ratio of sapwood to heartwood than the trunk, and mushrooms feed on sapwood, so we used mostly limbs with a diameter of 6 to 10 inches.

These are about half of the logs we inoculated last week, with shiitake plugs. They’ve since been leaned vertically around the side yard in areas with 90% shade.

The other half we inoculated with oyster mushroom spores, and stacked log-cabin-style in the shade.

Here are the logs we already had inoculated, including two logs we took home from Maya Creek and a dozen logs we helped inoculate with Backdoor Harvest about a month ago. Eric got the white oak limbs for free from a local tree trimmer.

If we’re lucky we’ll see some mushrooms before winter, or at least signs of mycellium, the vegetative part of the fungus, colonizing the logs. Once colonized, the logs should regularly “fruit” every 8 weeks for 5 + years!

Our very own mushroom logs

It’s Earth Day, and nothing says “earthy” like mushrooms! Coincidentally, our friends at Maya Creek hosted their first workshop yesterday on growing shiitake mushrooms.

Tao (left) and Jesse (right) walked us through the steps, from the selection of the wood (oak), to drilling holes for inoculation and hammering in plugs of shiitake spawn, and lastly applying a coat of wax.

We drilled, hammered, and waxed our way through 2,000 plugs! We got to take home two inoculated logs, pictured above, and we had time to enjoy some of Tao’s homemade hard lemonade and mango wine after our productive afternoon. We’re looking forward to the rest of their free workshops (here’s their 2012 schedule), join us!

Below are some close-ups of the waxed-over plugs.

Our newly inoculated mushroom logs will stay off the ground in a shady spot for 6-18 months, when they should start fruiting. Excited for lots of fresh shiitakes this fall!

Tao recorded the workshop on video, but it has not yet been posted to their website. For more in-depth information on growing mushrooms on a log, here’s a great online publication from the Alabama Cooperative Extension System.

Book Review: Radical Homemakers

Like Nick Rosen in Off The Grid, Shannon Hayes begins her book, Radical Homemakers, Reclaiming Domesticity from a Consumer Culture, with a history lesson in Part One: Why. Hayes discusses the role of homemakers and how the position has changed so drastically in so little time. Skilled homemakers who used common knowledge to provide for their families were replaced in the rampant consumerism and convenience craze that started early last century. Electric appliances, packaged (processed) food, and the automobile turned skilled homemakers into consumers instead of producers. The problems only grew worse as more women- many seeking more meaningful lives outside of buying and chauffeuring for their families- entered the workplace.

Part Two: How presents the many ways radical homemakers are reviving skills that were once universally-used, common knowledge. Read more of this post

Frugal Friday: Grape Jam

The Jewish holiday of Passover begins tonight at sundown, meaning no leavened bread- or any grains used to make leavened bread- for 8 days. We don’t buy much processed food, but it’s still difficult to avoid corn products- high fructose corn syrup in particular- that turns up in the most unlikely places. So when I saw we had some extra grapes in the fridge this  morning, I decided to make some fresh, corn-syrup-free jam for Passover.

The process is surprisingly easy, and you don’t need to buy pectin or any other gelling substance. Sugar can be used to preserve fruit, so you just need equal amounts (in weight, not volume) of grapes and sugar (we’ve also done cherries this way). Or you can make grape jelly by using grape juice instead of whole grapes. Lots of people use concord grapes that are easy to take the skin off of. I don’t even know what kind of grapes we had, but they weren’t easy to peel so I just left the skins on.

I threw the grapes in a big pot over high heat and mashed them up a little to get some juices flowing. No need to add water, since more liquid gets released as the grapes cook. Once everything was nice and soft, I pureed the mixture to get a more even consistency, then added the sugar and returned to the heat.

Since this process doesn’t use pectin, the thickening is achieved by continuing to boil the mixture to cook off the liquid. It took about 20 minutes to get to a good consistency. To test, take a cold plate (I put it in the freezer) and drop a spoonful of jam on it, then return to the freezer for a minute. This will give you a good idea of the consistency your jam will be once cooled, and you know it’s done when it holds its form and wrinkles when you push on it.

If you’re making a lot of jam, you’ll want to use a water bath to can it all. We made a small batch this time: two-and-a-half pounds of grapes and two-and-a-half pounds of sugar made exactly one quart of jam. We poured it into a mason jar and will keep it in the fridge.

Now all we need is a great peanut harvest this season- PB&Js from scratch!

Winter Reading: Off The Grid

As future farmers and homesteaders, Eric and I aspire to live off the grid- providing our own electricity, water, and sanitation needs without the power and utility companies. Nick Rosen’s Off the Grid, tackles the complex question: why do people live off the grid? The first section of the book provides the reader with a bit of a history lesson, describing the early days of electricity, explaining the industrialization of electric and water suppliers, and discussing the new era of the so-called “super grid.” There were more than enough reasons in just the first chapter to make me want to live off the grid.

The second (and larger) part of the book chronicles Rosen’s adventures around the US, seeking out and meeting people who live off the grid. Rosen has categorized the off-gridders based on their motives- some choose to live off the grid to be more in tune with nature or to be self reliant, while other people have no choice, unable to pay for the utilities (or even a place to live), or living in an area not serviced by the grid.  Through the journey, Rosen shares a lot of reasons why people live off the grid, but I wish that some sections had been more detailed, specifically how some off-the-gridders implemented their self-reliant lifestyle. There is little mention of how his subjects access water or handle their waste, though Rosen includes water and sanitation in his definition of the grid.

Fortunately, Rosen has a website, with a blog, forums, and other resources that have answered all of my concerns. If you’re interested in homesteading and self-sufficiency, you should really check it out at off-grid.net.

Winter Reading: Made by Hand

This is not a step-by-step guide to living a more sustainable life, a la Possum Living  or Surviving the Apocalypse in the SuburbsInstead, it’s the story of Mark Frauenfelder’s  journey into a more do-it-yourself (DIY) lifestyle. The book starts off with Mark and his wife deciding to move to a remote tropical island to escape the money and stress of their lives in California. I liked where this was going…

However, Mark and his family realize that the island life isn’t for them. They move back to California and Mark finds himself on a new path after collaborating to create and edit the DIY magazine, Make. With inspiration and motivation from other DIYers in his life and online, Mark starts a garden, converts a shack into a chicken coop (and sets up an automatic door to let the chickens out every morning!), collects and keeps a native bee population, and even creates his own musical instruments. Throughout the book he describes the processes he follows, sharing his accomplishments and defeats with grace and humor.

Sallie gave us this book not knowing if it would apply to us or if we’d like it- she was right on the money! Now we’ll have to figure out how to make our own automatic door for the chicken coop!

P.S. While we’re talking about “made by hand,” Eric got me a fantastic novel last year called World Made By Hand by James Howard Kunstler. It’s a post-apocalyptic story that describes a town learning to live off the land and off each other in the face of violent gangs and corrupt politicians. Definitely worth a read.

Frugal Friday: Homemade Seitan, a Versatile Meat Substitute

Seitan is a high-protein, vegetarian meat substitute that has, along with tempeh, allowed us to minimize our consumption of processed tofu, which is best eaten in moderation, as there are several studies debating its health effects. Seitan is wheat gluten that has been separated from the starch, leaving a protein-rich, elastic material.

You can buy seitan already formed and flavored (expensive), make your own using vital wheat gluten flour (still somewhat expensive), or make your own from flour (cheap!). We had been following this recipe to make a tasty seitan log from vital wheat gluten until yesterday, when we finally made our own from flour. It was incredibly easy. Here’s how we did it:

dough ballWe followed the process from this how-to on Forkable, though we changed it up a bit. We mixed 12 cups of unbleached flour and 6 cups of water to form a ball of dough, and kneaded it for a few minutes. We put the dough in a large bowl and covered it entirely with water and let it soak for about half an hour. The water turned milky white as the starch started to leach out of the dough. We put the bowl in the sink and kneaded the dough in the water until it started to feel rubbery.
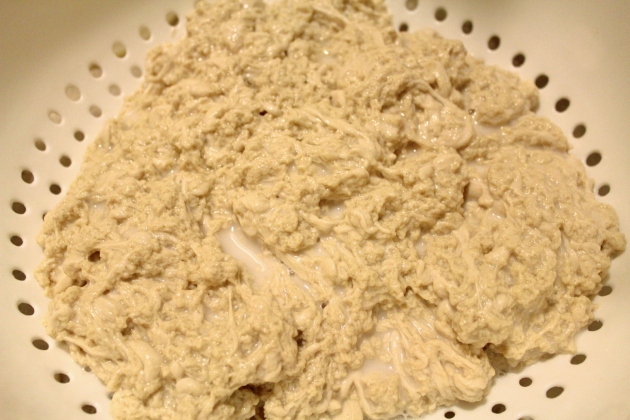
making seitanAfter the underwater massage, we dumped the dough into a colander in the sink and began a half-hour long rinsing and kneading session.

As you knead and rinse to remove the starch, the dough starts to get denser and more elastic. You can control the texture of your seitan by kneading more or less. For our purposes, we wanted a chewier result so we aimed for a texture like the smaller ball at the top right, while the the bigger mass in the middle still needed some kneading.

Most seitan recipes at this point will instruct you to form the gluten into a ball and boil it in broth. Then you can pack it into containers with the broth and refrigerate or freeze it. We had a different plan.
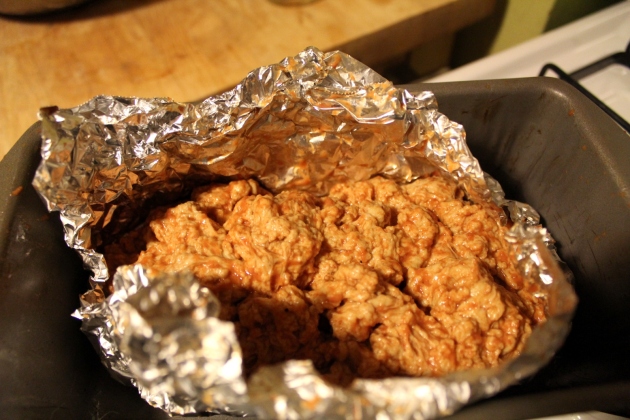
not the most appetizingWe wanted to try an approach more like the above-mentioned seitan log recipe. So once the gluten was formed, we worked in a marinade of tomato paste, olive oil, soy sauce, and seasonings, then oven baked it in a loaf pan at 325°F for about an hour and a half. We had it wrapped in foil like the log recipe but saw the seitan wouldn’t hold its form and the foil began to stick, so we dumped it in the loaf pan, added more marinade, and covered it with foil. Every twenty minutes or so, we stirred and turned the seitan to keep it from sticking to the pan. We also split some of the bigger pieces into smaller chunks to cook more evenly.
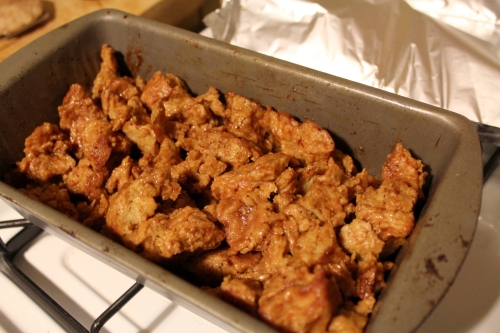
seitanWe ended up with about 4 cups of chewy seitan chunks from the original 12 cups of flour. Overall, the process took about 3 1/2 hours, most of which was cooking and waiting time. Next time we’ll try incorporating the marinade and seasonings before the gluten is completely formed so the seitan will be more infused with flavor and maybe achieve the log texture.  To be extra frugal, we’ll also re-use some of the starchy water from the rinsing stages to thicken soup stocks and sauces, instead of letting it all go down the drain.

We love to make protein-rich wraps with sauteed seitan chunks, quinoa, cucumbers, red onion, avocado, hummus, and parsley and salad greens from the garden.

You can use seitan to substitute any sort of meat, or tofu for that matter. Throw it in a stir fry instead of cubed tofu, crumble it in pasta sauce or add it to chili like the commercial soy crumbles, bread it and fry it for a chicken nugget type snack, we might even slice it in strips and put it on a barbecue pizza! With bulk flour from our co-op, we may never have to buy meat alternatives ever again.